

Attribute From Pieces
Visit the Node Bible
Attribute From Pieces
To use this node, plug the first input into the points that you're copying the object to. In the second input, plug in the geometry that's going to be instanced onto the points. See the diagram below for a visual representation of how to set this up:
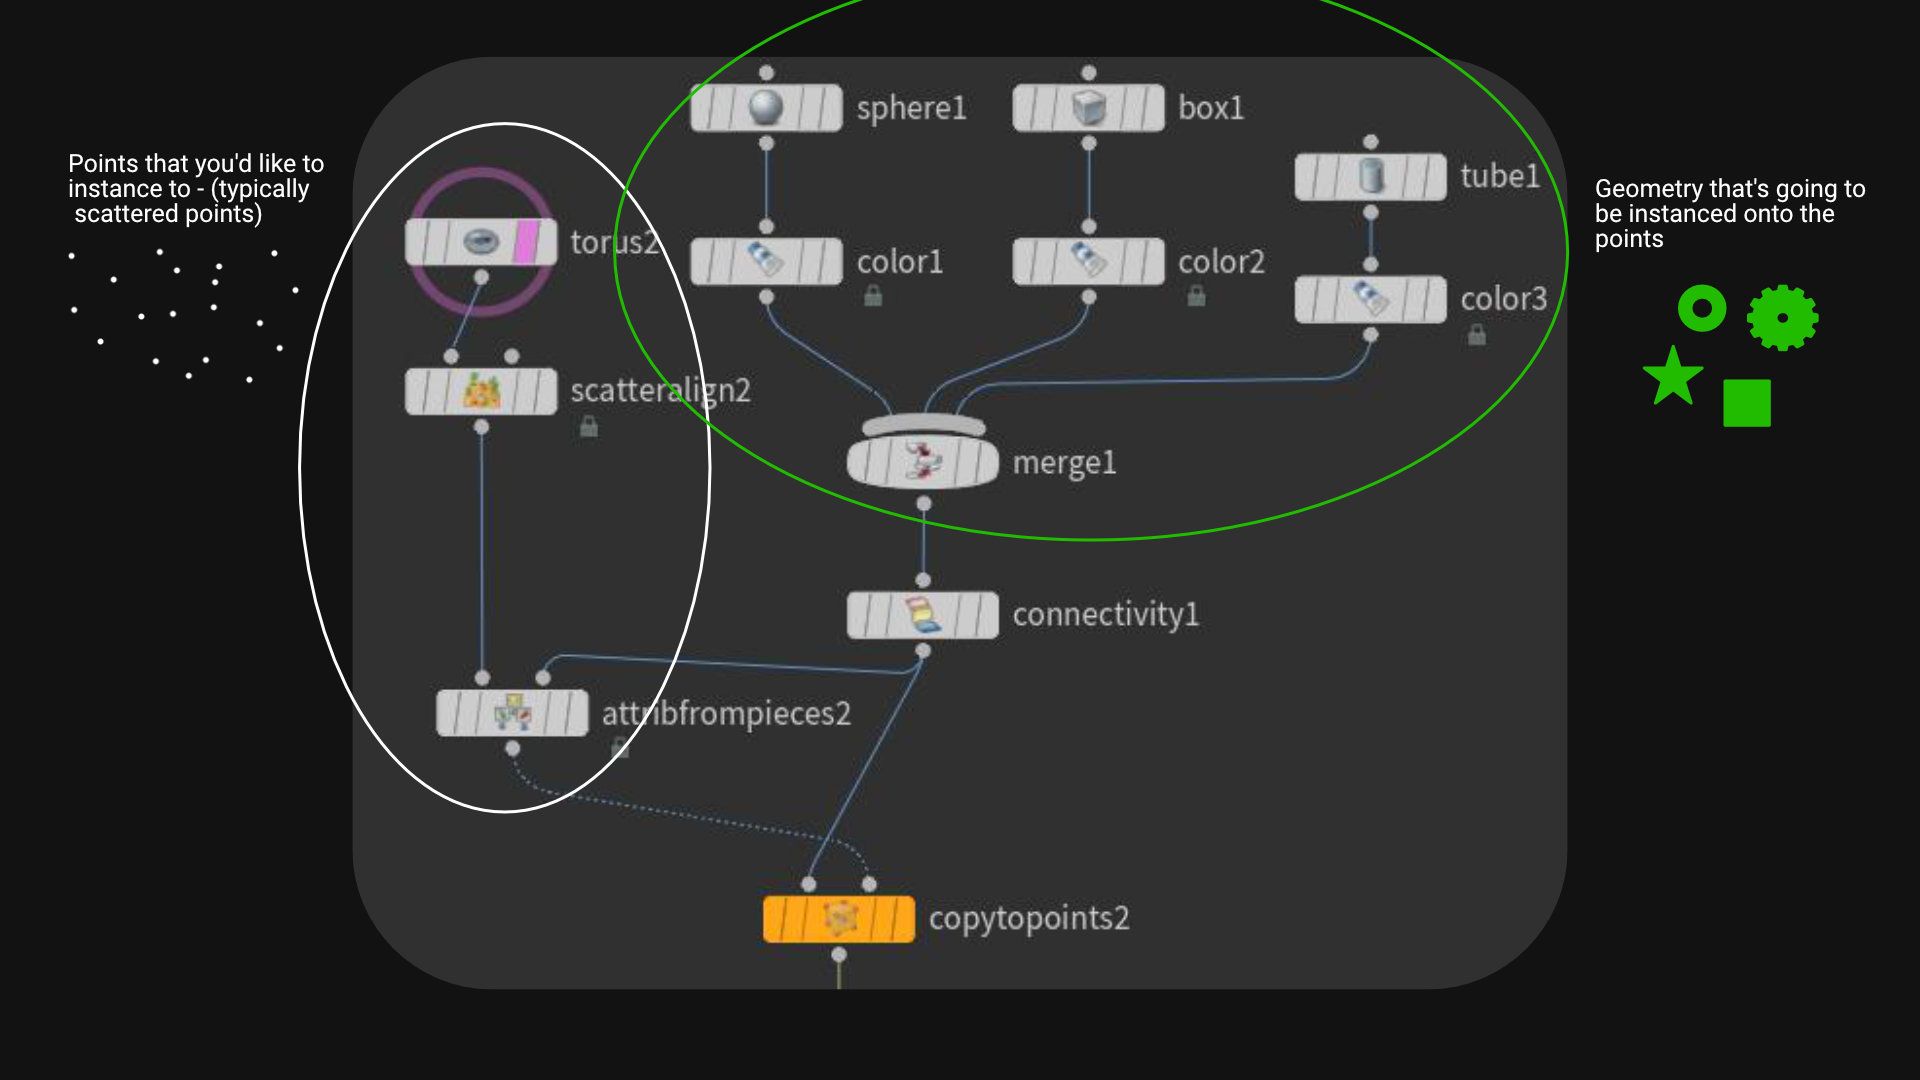
This node may also work well with the Sort node because many operations will rely on point IDs.
General Parameters:
Piece Attribute:
-- As mentioned above, this node is trying to select which pieces go to which points when instancing. It does this by matching this “piece” attribute on the points with a piece attribute that’s on the instanced geometry. The important thing to remember here is that the piece attribute must match what is assigned to the separate pieces of geometry.
-- NOTE: This node seems to be very picky about whether or not the piece attribute is a point or primitive attribute. In practice, I have found that it works best when you define a primitive attribute that gets used for matching pieces to points. If you have both primitive and point attributes, this node seems to not work properly.
Piece Filter:
-- This parameter is optional. If you want to only consider certain piece values when making a section, you can specify so here. As an example, let’s say that you had a piece attribute called “name” on three rocks. The value of the name attributes on those rocks are, “rock001” “rock002” and “rock003” Now, lets say that you don’t want to use “rock003” because you’re only interested in instancing “rock001” and “rock002” If that’s the case, then you can use this piece filter to isolate rock001 and rock002 by saying “rock001 rock002” This parameter recognizes different names values by adding a space between each value you’d like to consider.
Copy Attributes, Allow P Attribute, + Promotion Method:
-- In practice, I've found this settings to behave un-expectantly. According to the docs, "List of attributes to copy from source pieces. Attributes that match this pattern are aggregated over each piece using Promotion Method before they are transferred to the output points. Note: Attributes are copied from the same class as Piece Attribute. That is, if the Piece Attribute lives on points, then point attributes will be copied; otherwise, the attributes will come from primitives."
-- Instead of using these parameters, I suggest using an attribute transfer node or a wrangle after the attrib from pieces if there are any attributes that need to be adjusted.
Mode:
-- The mode is the primary way of determining how you’d like to instance each piece to each point. The settings on this node will change depending on which mode you select. As you read through the various modes below, the associated parameters will be mentioned below the corresponding image.
-- Cycle = The instanced geometry will go in order (ex: “rock001” “rock002” “rock003” etc...) and repeat as the points ascent in their point ids. Below is an image demonstrating this mode:
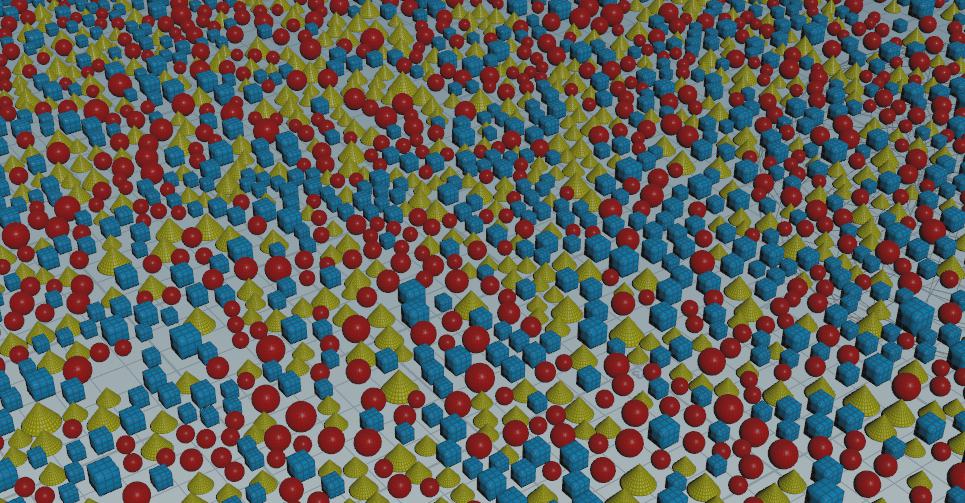
Shuffle Pieces:
-- Turn this on to randomly scramble the order of the pieces
Seed:
-- This gives you a different version based on the settings you've specified
Offset:
-- This will shift the order of assigned pieces forward by a certain number
----------------------------------
-- Patches = According to the docs, "Assigns the pieces in random “splotches” (using Worley noise). That is, instead of randomizing each individual point, it randomizes irregularly shaped groups of points."
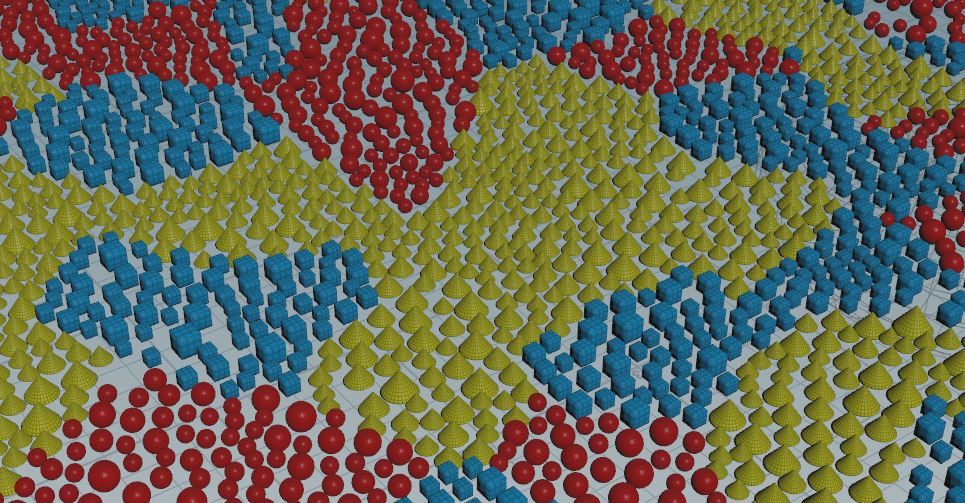
Patch Size, Scale, and Offset:
-- Adjust these setting to change the shape of the patches.
Distortion:
-- Strength = how much to distortion to apply
-- Size = Changes feature sizes
-- Roughness = Changes how much small detail there is in the distortion effect
-- Offset = Offsets the distortion in X,Y,Z
-----------------------------------------
-- Noise = According to the docs, "Assigns the pieces using noise. This is not the same as randomizing each piece. Instead it assigns a piece based on the quantization of the output of a chosen noise function. This lets you create organic-looking patterns and other effects."
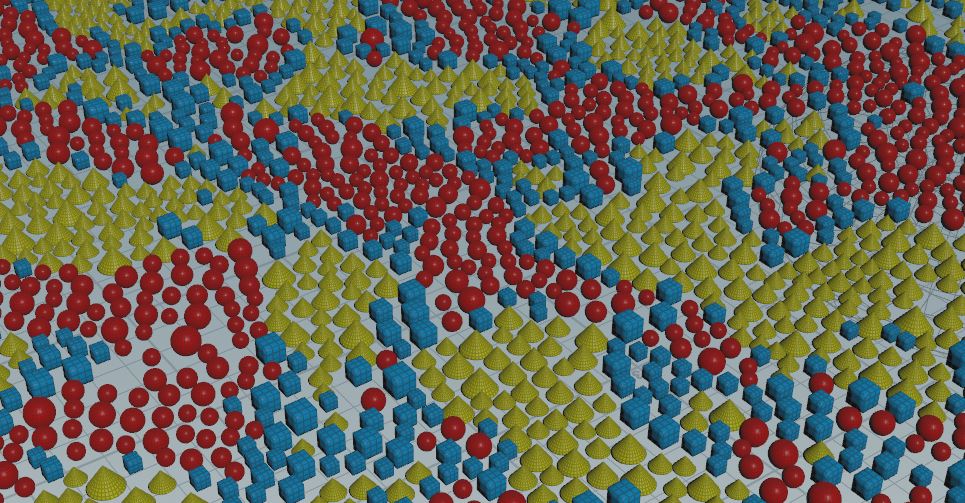
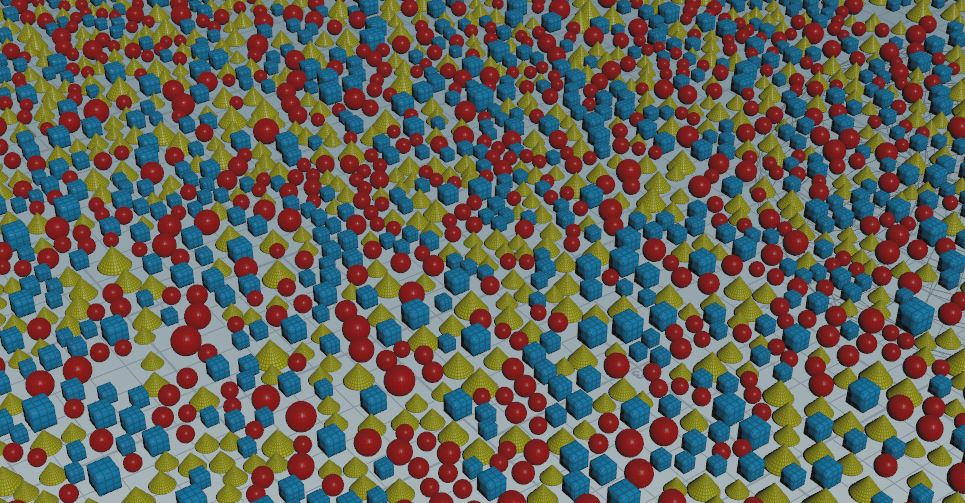
-- Random = According to the docs, "Assigns pieces to points randomly. You can assign weights to each piece to make some pieces more likely than others."
Weight Method:
-- Uniform Distribution + Seed = All pieces are assigned randomly without favoring any one piece over another. The seed will give you a different version of the uniform distribution
-- Piece Weights = This allows you to favor certain pieces over others. Use the "Autofill Pieces" to create weights for each detected piece that's coming in from the second input. You can then assign a weight to each piece. The higher the weight, the more likely it is to spawn that piece relative to the others.
-- Weight Attribute = According to the docs, "Use a primitive float attribute on the piece geometry that sets the piece’s random weighting. The weighting for a piece is the average of this attribute’s values across the primitives of the piece." In practice, I've found that this works pretty much just like the Piece Weights does where it favors certain pieces over others based on a weight value. For most situations, it makes more sense to use the piece weights method instead of this method, however, you can do so by assigning each instance a float primitive attribute that will act as a weight.
-------------------------------------------------
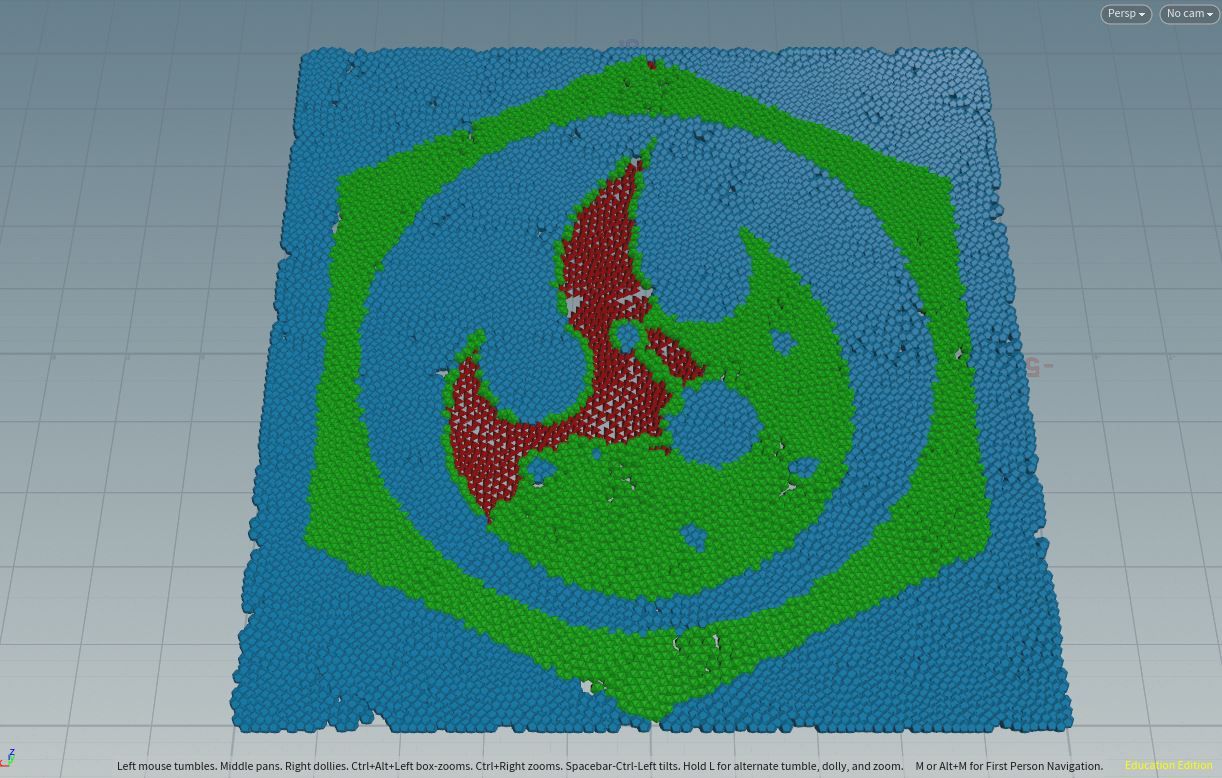
-- Map Attribute = According to the docs, "Assigns pieces to points based on the value of an attribute on the points." This mode, in particular is very useful because it takes a point attribute and uses it as a seed for selecting geometry. In practice, this can be used with the Attribute From Map node, Attribute Paint, Distance From Geometry, or the Masking nodes to select which instances get placed at certain locations. As an example, take a look at this screenshot using the Attribute from map to select random pieces:
Here's an example of what you can do with this mode:
Attribute:
-- This field is asking for the point attribute that gets used to determine which piece gets selected.
Attribute Type:
-- Numeric = The data used for selection is a number
-- String = The data type used for selecting instances is a string (in other words, a value which uses “words” instead of numbers like, “1,2,3”
Map Pieces From:
-- Automatic Ranges = According to the docs, “Automatically creates a mapping between equal-sized ranges of values in the attribute and the available pieces in the second input”
-- Explicit Range = This allows you to specify which piece gets assigned to which values. For numeric attribute values, you can specify a range. For String values, you can explicitly state which word gets paired with which instance.
Autofill Pieces:
-- This will create rule entries for each individual piece that’s recognized from the second input. So, if you have three pieces, it will create three rules for you to define.
Unmatched Piece:
-- If a piece doesn’t fall in range with the rules specified above, then it will assign this primitive to the point.
Unmatched Group:
-- This will group any primitives that didn’t match a rule that you specified above.
Seed:
-- Provides a different version based on the rules you specified above
---------------------------------
-- Vexpression = This mode allows you to distribute pieces based on a true/false vex statement. See this image as an example:
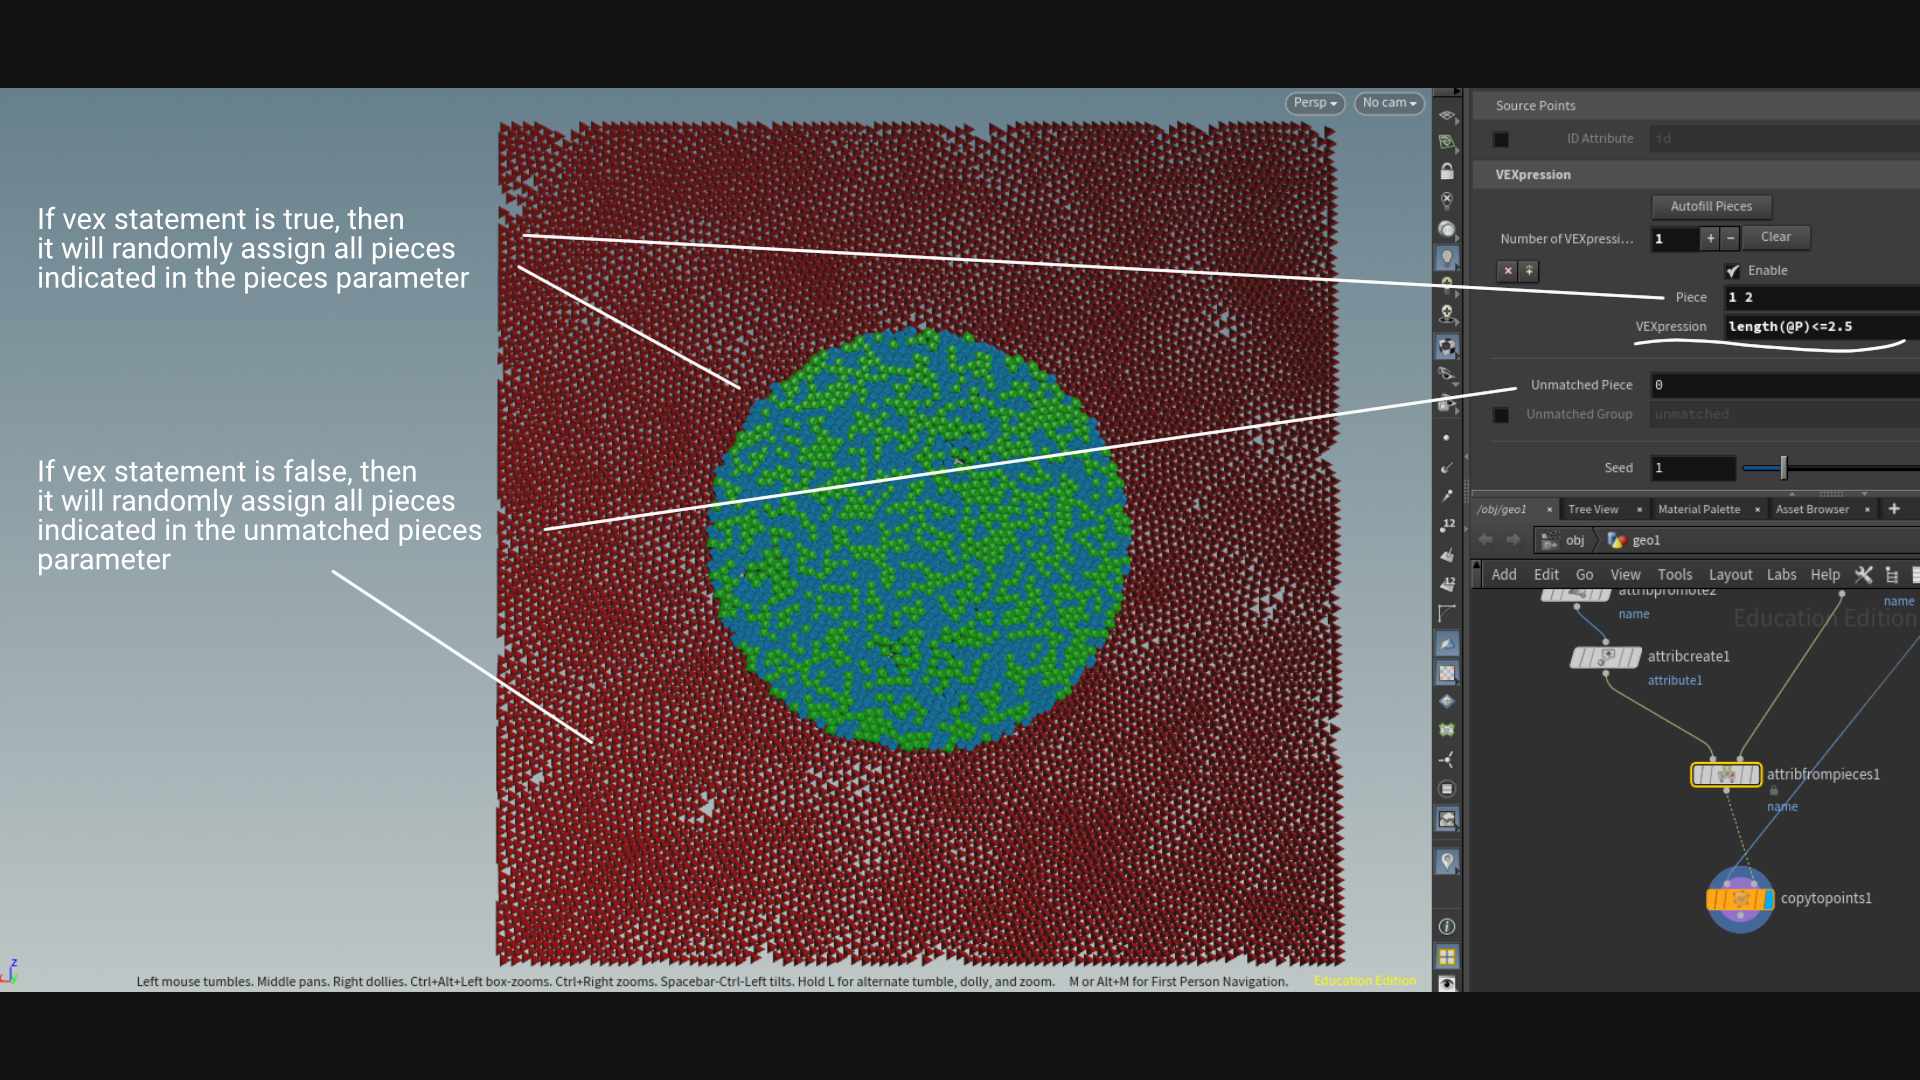
ID Attribute:
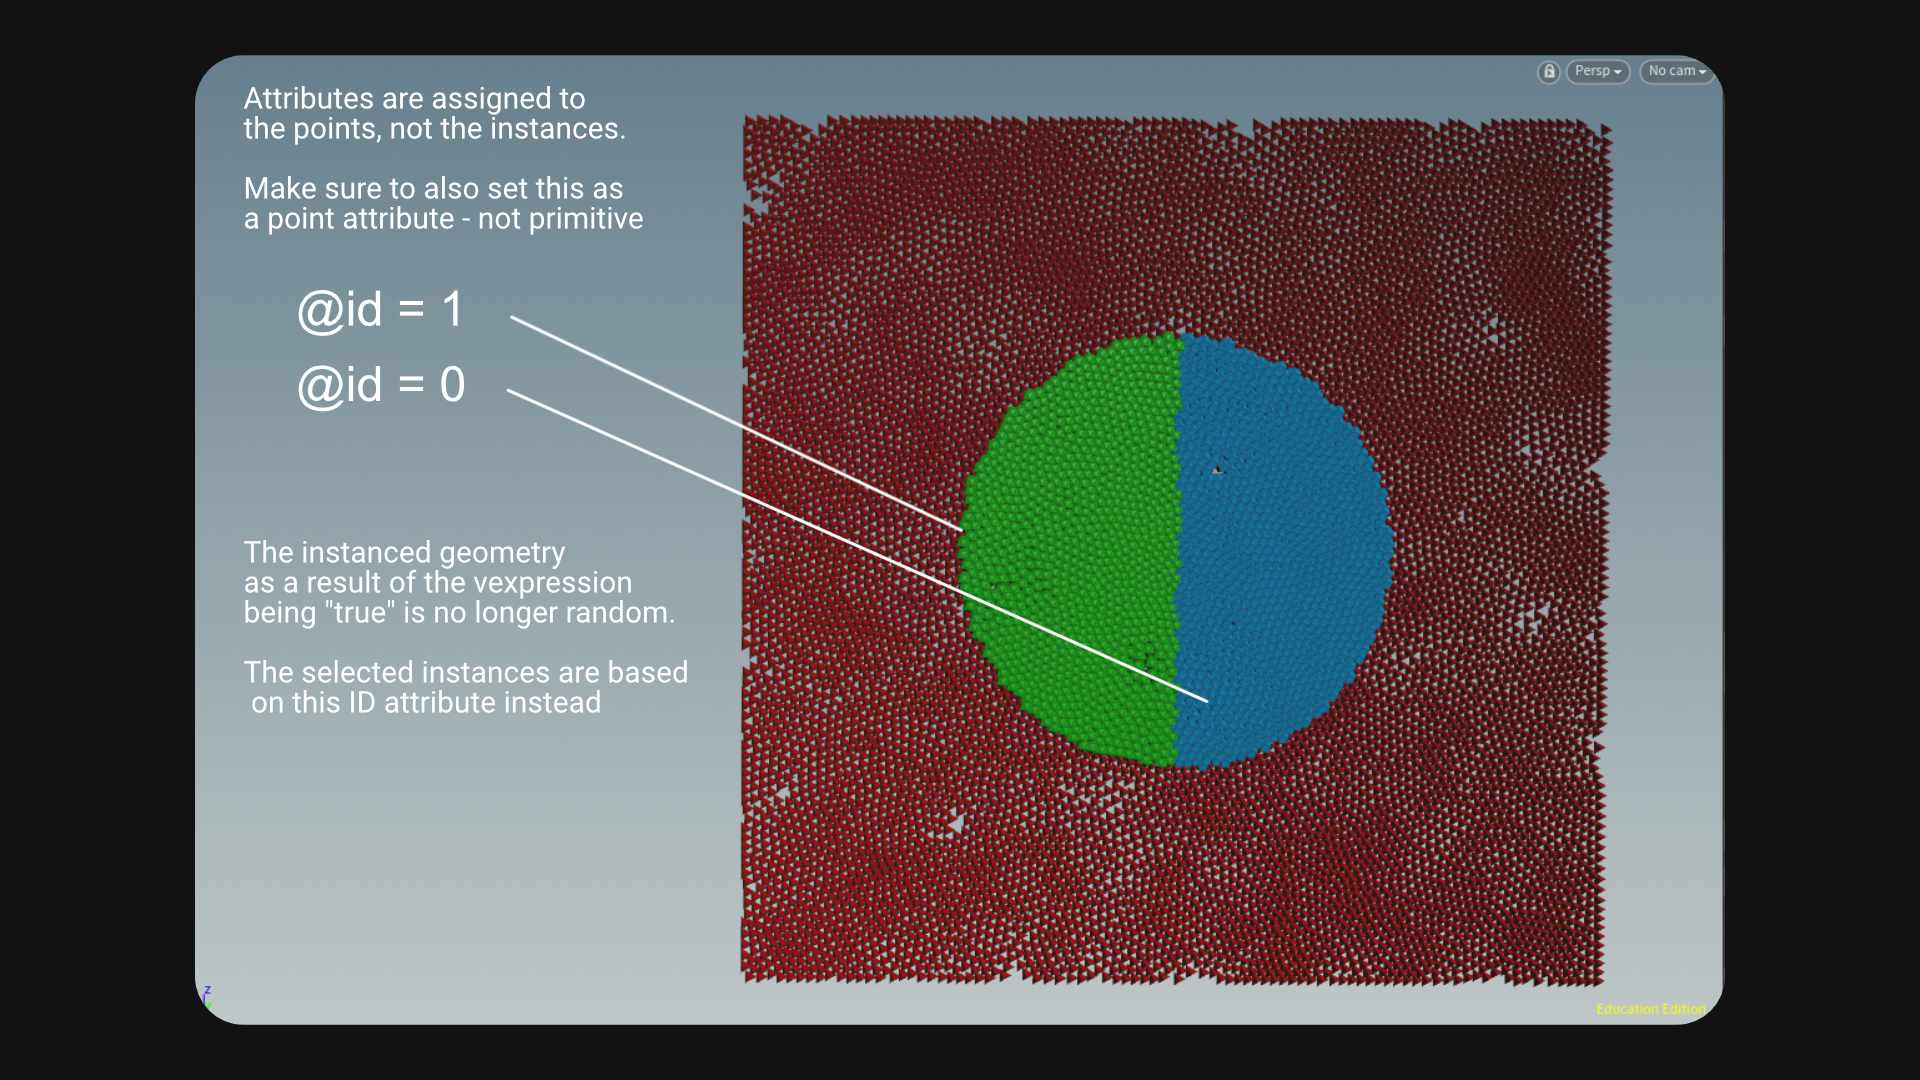
-- This attribute gets used to aid in deciding which point gets assigned to which instance. Normally, the point ID is used as a seed when determining which instance is selected. This ID attribute can override that behavior. Instead, when this is checked on, an attribute is used to determine the seed that's responsible for selecting which instances are placed as points. As an example, if we assign an ID value of 0 on the lefthand side of the circle and a ID value of 1 on the right, this is what we will get....
Featured links

About Mentorship Calls
As a premium subscriber, you'll receive an email once a month with all the info necessary to schedule your call.
Study Plan Call
Look at the welcome email for further instructions on how to schedule a call if you are a Premium Subscriber.
Premium Member Discord
Unlike the standard discord server, the Premium Member server receives faster replies, feedback on projects outside CG Forge courses, and exclusive discounts on mentorship calls that aren't offered anywhere else.
Houdini Education License
In summary, the educational license of Houdini acts much like Houdini Indie - but at a discounted price. The main difference between Indie and Education is that this version of Houdini cannot be used for commercial projects. It's great, however, for learning and preparing a demo reel without the limitations of Houdini Apprentice.
Unlock Resources
One of the best examples of this is the Node Bible. This resource acts like an encyclopedia of Houdini knowledge. Each entry features a node, goes through all the parameters, and offers video quick tips on how to use each node. The Node Bible goes beyond the native Houdini documentation because it's easier to understand, offers practical examples, and links up to nodes that get used in the courses.
In the resource sections, you'll also find quick tips that cover a variety of miscellaneous topics along with The Weekly Wrangle - which is a series dedicated to advice and real-world conversations surrounding career success.
Redshift Discount
https://www.maxon.net/redshift
Aug 28th, 2024 Changelog
General Changes:
• New, simplified website design is now live!
◦ All new particle banner is featured on the home and after login pages
◦ The after-login page now features courses that are sorted by ones that you have recently watched. This makes it easier to continue watching whatever you’ve been working on without scrolling through all the courses to find what you’re looking for.
◦ There is also a new “resources” section that can be found beneath the “Browse Courses” on the after-login page. This makes it easier to bring up the Node Bible, the “Tips + Tricks,” or Weekly wrangle in a new tab
◦ “CG Forge Academy” has been replaced with a “Mentorship Calls” at the top menu (see below for more details)
◦ The resources dropdown now features “Tips + Tricks” (see below for details)
◦ Certification requirements have been slightly re-written to be easier to understand
◦ Subscriptions have been re-designed from the ground up (see below for details)
Subscription Changes:
• Subscriptions have changed to include a "Basic Subscription" and a "Premium Subscription" option. The Basic Subscription renews monthly, and the “Premium Subscription” renews every 4 months. Yearly subscriptions have been removed.
◦ These changes only affect new subscribers. Existing subscribers will not see anything change with their auto-renewal amount.
◦ 10% off a Redshift yearly subscription is now included with the Premium Subscription. (If you are currently a 4 or 12 month subscriber, then just email support@cgforge.com for this)
◦ A new “Study Plan” call has been added to the Premium Subscription. (If you are currently a 4 or 12 month subscriber, then just email support@cgforge.com for this)
◦ A Houdini education license is now available for “Premium” subscribers. (If you are currently a 4 or 12 month subscriber, then just email support@cgforge.com for this)
◦ For more information, visit the subscriptions page.
• CG Forge Academy has been redesigned to be easier to use.
◦ 45 minute calls have been removed. Existing coupons are still valid and can be used towards 90 minute sessions for the amount listed on each coupon.
◦ 8 week mentorships have been removed - Instead, you can book as many 90 minute calls as you’d like.
◦ Free onboarding calls have been removed - Instead, premium subscribers now receive a complimentary “Study Plan Call” that establishes a personalized curriculum moving forward.
◦ The “CG Forge Academy” top menu is now replaced with “Mentorship Calls” and only allows for booking 90 minute calls.
All new “Tips and Tricks” resource page:
• “Tips and Tricks” is now a resource page that holds all quick tips, Houdini update videos, and other miscellaneous videos in one place. If you’re looking for “Quicktips Season One and Two” or "Houdini 19 Updates" they have now migrated over to the “Tips and Tricks” resource section.
Discord changes:
• The CG Forge Discord channel will now be divided into two categories: “Basic Members” and “Premium Members.” The premium member channel will be invite-only to premium subscribers or those who are currently enrolled in a 4 or 12 month subscription. If you eligible to join the premium discord channel, email support@cgforge.com for an invitation.
◦ Basic Discord members will no longer receive support for projects that are outside the topic of CG Forge courses.
◦ Premium Discord members will receive support for projects outside of CG Forge content
◦ Premium members will receive discounts on mentorship calls, and basic members will not.
◦ Premium members will have their questions / posts answered before basic members
◦ Early access to courses will now be exclusively provided to premium members via the discord channel.
If you have any further questions about these changes, feel free to email support@cgforge.com
Cheers,
- Tyler
1:1 Support and Feedback
Unlock ALL Courses
Instead of paying lots of money for ONE course, you can pay less for a library of courses.
With CG Forge, you can also count on highly refined content that's conveniently found in one place. This makes it easy to cut through the clutter of Houdini tutorials out there and make the most of your time while you learn.
Disturbance
"The disturbance force introduces small amounts of change, mimicking the effects of localized environmental change. This localized change in momentum cancels itself out over time, preserving the simulation’s general motion and overall shape."
In practice, disturbance is great at capturing smaller details in a pyro sim. It's not as great at capturing larger movements and details. Artists will often use disturbance to break up mushroom shapes that occur along the leading edges of smoke simulations or to add tiny bits of detail in general.
Disturbance has two primary modes: Block-based and Continuous. Block based gives you better control over how large the detailed shapes are. The block size is represented in meters, and the larger the size, the larger size the randomized forces are on the pyro. Continuous will provide a fuzzier, smaller-detailed look, and it is often better to use when trying to soften the overall look of a pyro simulation. Continuous mode can be useful when representing avalanches or areas of mist along a waterfall.
